1996 Pontiac Bonneville Remote Programming Instructions

Written by Cole Fuquay
Updated at September 29th, 2025
- Key Cutting Equipment
- Universal EZ Installer
- On Board Programming
- Pairing Equipment
- Simple Keys
- Support Documentation
- Universal Remotes
- Vehicle Information
- NASTF Resources
- FAQs
- Latest Updates
- OEM Programmers
- CKE Programmer Manuals (dongles)
- ROKS Box Information
- Programming Advice
- General Key Information
- Close all doors.
- Insert keys in ignition and leave in the off position.
- Locate the OBDII port under driver's side dashboard. Note port is wider at top: your OBDII port will not have numbers. Use this for reference:
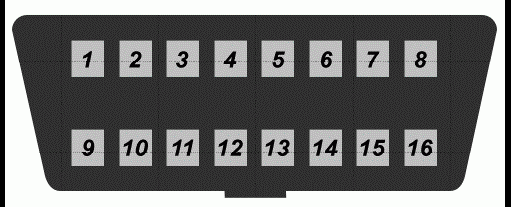
- Make sure there are metal contact pins in terminals 8 and 4.
- connect 8 and 4 with a suitable jumper wire (leave jumper wire connected throughout the programming procedure.) Make sure you know which terminals are 8 and 4.
- The vehicle will respond by locking and unlocking the doors to signify entering of programming mode.
- Turn ignition to the on position (as far as you can go without cranking the engine). Doors will lock.
- Press and hold both the lock and unlock buttons together on the first remote to be programed up to 30 seconds.
- The vehicle will respond by locking then unlocking the doors.
- Release buttons.
- Within one minute, repeat Step 6 for any additional remotes, if any, including existing remotes.
- Remove jumper wire from OBDII port.
- Test remote(s).